Functionality of the nodal point
To understand the nodal point, try being a camera yourself. If you stretch your arm out and hold your thumb up (as you do with a hitchhiking) and then use one eye (close the other) to point a straight line (e. g. house wall) at a further distance over your thumb, these two lines should be congruent.
Now turn your head - the thumb will move away from the line. The axis of rotation of the human head does not represent the nodal point. If you stretch your head forward and then turn it, you will find that the thumb-house-wall line will move apart even faster. So this position is even further away from the nodal point.
Put your head back and then turn your head and watch both lines. Now the difference between thumb and wall should be less when turning the head. The nodal point has still not been reached, but it is heading in the right direction.
What is wanted in humans (this creates spatial vision) is undesirable when creating panoramic photos. You must rotate the camera 360 degrees to take a full panoramic picture. However, the foreground and background should not "jump around wildly", but should be identical for every photo.
In landscape photography, when everything is only far away, this is a small problem. However, as soon as objects are in the foreground and a background is present, the nodal point must be found (and maintained) for the combination of camera and lens used. Fixed focal lengths are available, as the focal length also influences the nodal point.
The nodal point adapter is available for easy adjustment and execution. Such adapters can be bought or built by yourself.
The nodal point adapter
The nodal point is required so that no "ghost images" are created by rotating the camera when taking panoramic shots or 360-degree spherical images.

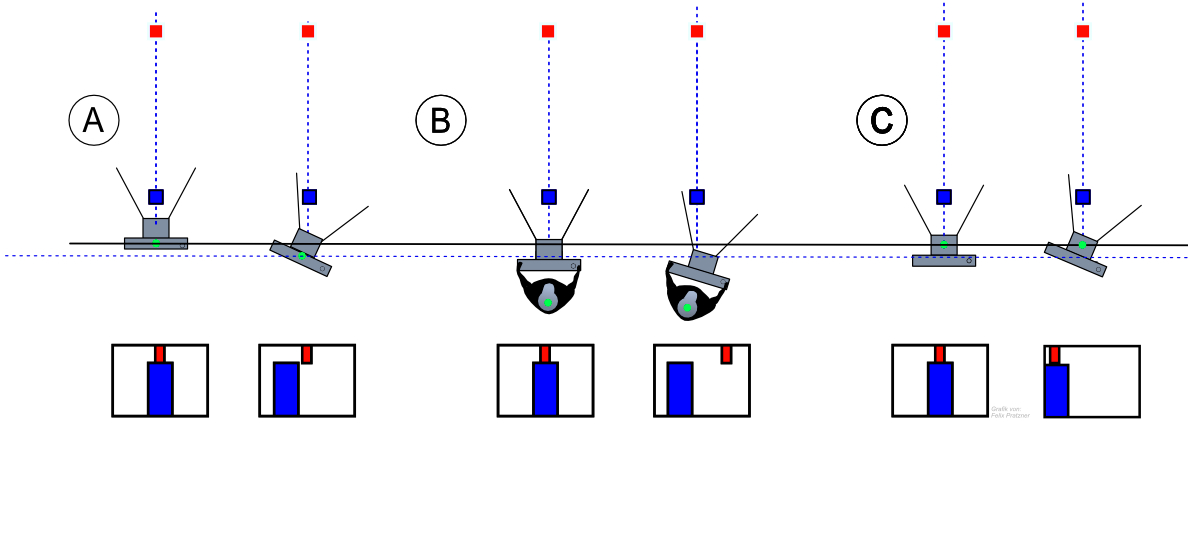
The nodal point is therefore exactly the pivot point that leaves foreground objects in the same ratio as background objects when the camera is rotated around this point! In an example it becomes understandable: We have a vertical line in the foreground (e. g. lantern post) and a vertical line in the background (e. g. a house edge) and on the first photo both are exactly the same one after the other as in the example sketch under A the red and green column. These lines should continue to lie exactly behind each other when the camera is rotated as shown in the example sketch under C. This is the case when the camera rotates around the nodal point. In the example sketch we see the congruence only in C. At A the camera was rotated, but not around the nodal point. At B, the photographer rotates - there is even greater deviation from foreground and background. This means that the foreground and background are no longer the same and the calculation for the panorama photo will not work satisfactorily!
For a panorama photo, several individual photos are taken later. The camera is tilted 360 degrees around the nodal point. Using software, so-called stitching software, the partial images are automatically combined into a panorama photo based on the overlapping edges and lines. It is important that a sufficient overlap is recorded for each partial image during shooting.
During the recording, the photographer can make numerous mistakes that cause the finished panorama image errors or make it impossible for a software program to add the images to a panorama photo - more about this later.
Important: the thread for the tripod mount of the camera does not normally correspond to the nodal point! The nodal point of each camera is dependent on the lens and is located at a different point depending on the focal length used. Therefore, the nodal point adapter is required to set the nodal point (i. e. the ideal pivot point) for the respective camera/lens combination.
For a 360-degree horizontal panoramic photo that does not offer the full height, a quick release plate with adjustable spacing can be used. If you already have a tripod with an appropriate quick-release plate device (which for one word - a lot of points at Scrabble), this is a cheap variant of about 15 Euro to play with.
To find the nodal point, attach the camera to the adjustable rail and activate the Live View (most cameras have a Live View function). The focal length may no longer be adjusted - therefore fixed focal lengths are ideal. To keep the number of needed photos low, please use small focal lengths like 28mm or better 8mm. Now find two lines - one in the foreground and one in the background and place the camera so that the lines are congruent. Now you have to change the distance of the rail until the two lines remain congruent even when the camera is tilted. If this is the case, you have found the nodal point for this camera with exactly this lens with exactly this focal length!
Nodal point adapters are more convenient. Nodal point adapters are available from various manufacturers and can also be manufactured by the manufacturer himself. The nodal point adapter is constructed in the form of an' L'. If you want to create 360-degree spherical images, there is an extension arm so that the camera can be tilted around the nodal point not only horizontally but also vertically. If you want to build your own nodal point adapter, have a look at the page http://www.kugelbild.de/nodalpunktadapter_k. php.