21 typical posing mistakes when taking photos (and how to improve)
Many posing mistakes made by models need to be recognized by the photographer and reacted to accordingly in order to take the best photos.
The first step is always to talk to the model. Only if there is a good relationship between the photographer and model will the photos be good!
The second thing about posing is that there is a “completely or not at all”. Half-hearted posing looks insecure and the photos look accordingly. As a photographer, you need to be aware of whether you are taller or shorter than your model. You should make a conscious decision here (and whether it suits the image idea) whether to photograph at eye level, from below or from above!
There can be real (objective) problem areas (scars, orange peel skin) and also problem areas perceived subjectively by the model (I don't like my left knee). Regardless of the case - take the model 100 percent seriously, even if you have a different opinion about the problem area. Good posing always requires body tension from the model. This is exhausting and cannot be maintained for hours on end. So never let the model hold a pose longer than necessary. The magic word “thank you” helps to make it clear that the pose is “in the box” and that the model can relax briefly. It is also important that it is always clear when to pull the trigger. Counting is extremely helpful with some models. Then the air is also taken out of the book to show a very slim figure. Clicking the camera is also a helpful tool here. Suitable for the subject Always pay attention to a possible double chin (head is pushed back). We can work a lot with tension here. In today's working world, many people tend to hunch their shoulders forward because their back muscles are no longer as well developed. In some cases, this is also trained in women during puberty. So don't fold your shoulders forwards or pull your shoulders up towards your ears! Shoulders that are pulled upwards visually “shorten” the neck. Lowering the shoulders makes the neck look longer. Visible collarbones add more tension to the image. If no collarbones are visible, we have a lot of space in an off-the-shoulder photo, which can look boring. A slightly hollow back creates more tension and the pelvis is tilted slightly. This also stretches the body. Shoulders and pelvis are in line with each other The arms can be used to create guiding lines in the picture! Diagonal guiding lines create tension. Photographers very often “produce” visually thick upper arms by ignoring posing mistakes. The following chapter contains tips on how to avoid optically thick upper arms in future.
Both hands at the same height usually doesn't look good and results in an unattractive horizontal line that can draw the eye out of the photo. Hands show emotion - in some cases and cultures more, in other cultures less (but also!). Appear large and bulky. This is particularly awkward for portraits of women. Here, the sides appear delicate Perhaps for men to show strength (depending on the image idea) If hands are placed close to the face, they will quickly compete with the face if the area (back of the hand) is large! Attention may not be drawn to the focal point of the picture. The older the models are, the more critical skin changes become! Age spots, veins, etc. Spread fingers result in many lines and quickly look confusing. The upper part is interlaced fingers of both hands. The viewer is deliberately confused!
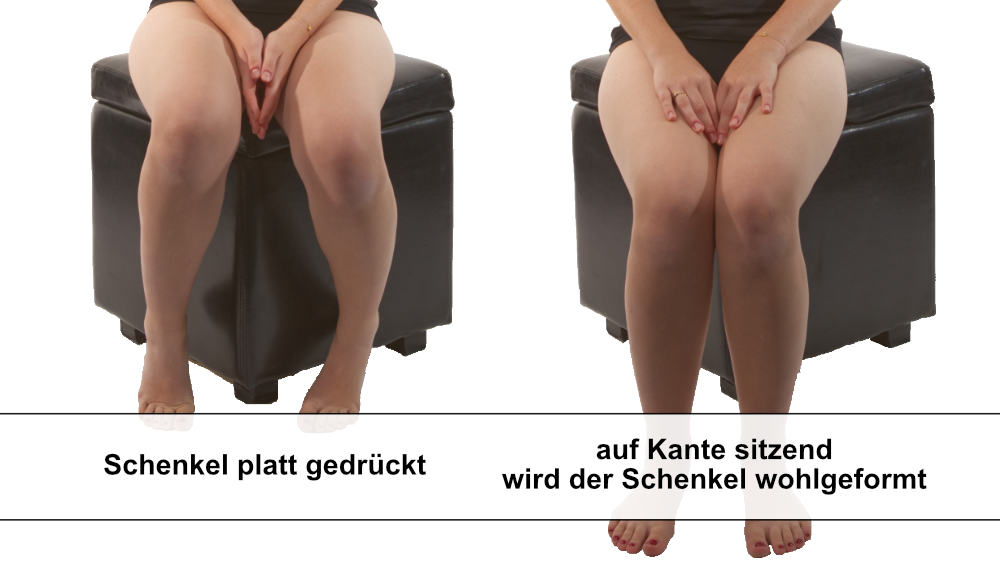
Avoid spread fingers! Slightly bent fingers create a graceful image effect. Happens faster than you think and looks unsightly. Fist in the side Supported hands can cause unsightly dents - please avoid this by only resting them lightly (whether on the face or hips) Experienced models can specifically take the “air out of the belly” during the photo and thus offer a slim pose. It's best to count so that the model knows when to pull the trigger. A frontal stance is unfavorable as it makes people look wider than they really are. First solution: frontal stance with one leg raised or turned In seated poses, make sure that the edge of the chair does not press the thighs wide. Solution: simply sit further forward on the chair as a model so that the edge of the chair slides backwards or have the leg lifted (stand on tiptoe). Tight legs also mean less contour on the outside (calf and thigh). Solution for more contour: put your weight on the supporting leg and stretch the other leg slightly Stretched knees usually look unattractive (especially in fuller people). Solution: turned body position and slightly bent front leg. Foot tips pointing straight forward often look strange. The normal stance is slightly turned outwards. Stable stance looks confident - toes turned inwards look shy and unstable. Always align your feet accordingly for the image effect. The tips of the feet also have a direct effect on the knee positions. Please pay attention to the position of your knees. Tightened feet are not relaxed (just try it yourself). Stretched feet make a leg look longer and therefore also slimmer. No visible soles (or shoe soles). This looks strange and is also considered an insult in some countries. Closed legs make a model look thicker. Always build up the posing over the feet and legs!A portrait is always a self-portrait!
Interaction between photographer and model
Problematic body parts and problem areas
Body tension
Head pose
Neck, double chin
Shoulders
Collar bones
Hollow back
Arms
Thick upper arms
Both hands at the same height
Hand position
Visible back or palm of the hand
Fingers
Optical amputations of fingers or limbs
Do not produce dents
Tummy
Frontal is usually unfavorable
Thighs, thighs pressed flat

Thigh, calf
Knee
Feet