Macro photography - Small Things Going Big
The charm of macro photography is to see things, that you can´t see with your bare eye, because they are too small. We want to magnify things greatly. The DIN 19040 about macro photography is tolerant with the scale and describes everything between 1 : 10 and 10 : 1 is already macro photography.
Wished is a minimum magnification of 1 : 1 - i.e. the motive is depicted as big on the sensor as it is in nature. When using a full format sensor that would be 36 mm to 24 mm.
When we have a magnification of 2 : 1 then the motive is two times as large as it is in reality.
The good news is, that you can already achieve thrilling photos with simple equipment. But one after another. Macro photography has some pitfalls, which you should know, to not get frustrated.
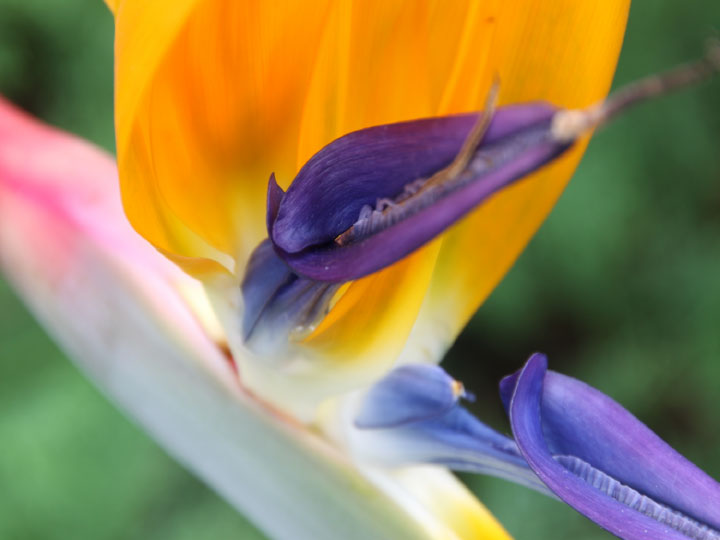
Great motives are those, which the observer can`t estimate in size, like following plant. The background for the following picture is, that the reader can still think about, if he wants to continue reading! Because now following are a lot of example pictures of insects, like spiders or grasshoppers, which isn`t for everybody. Whoever has an aversion against these animals, should`t continue reading.
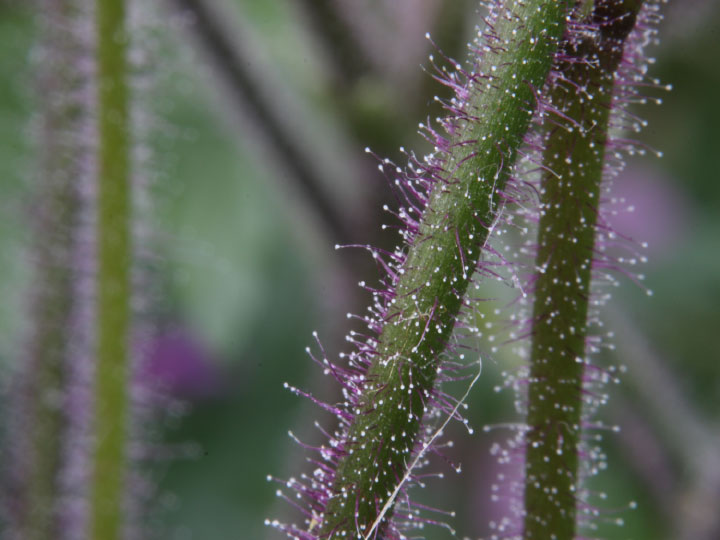
In macro photography we often fight with depth of field. In the following picture of a flower stem you can nicely see the droplets on the end of the hairs (are those the correct terms in botanic?). What you can also clearly see is the depth of field, which decreases rapidly. It doesn`t even go around that single stem. The stem in the background is already very blurry.
Here the basics, of what we learned in the chapter about depth of field, are crucial (whoever wants to read it up: https://www.photocourse.info/depth-of-field.php).
Depth of field depends on Distance
We want details and for that we should go as closely as possible towards the motive. But the depth of field decreases, the closer we are towards the object. And we want to be up close.
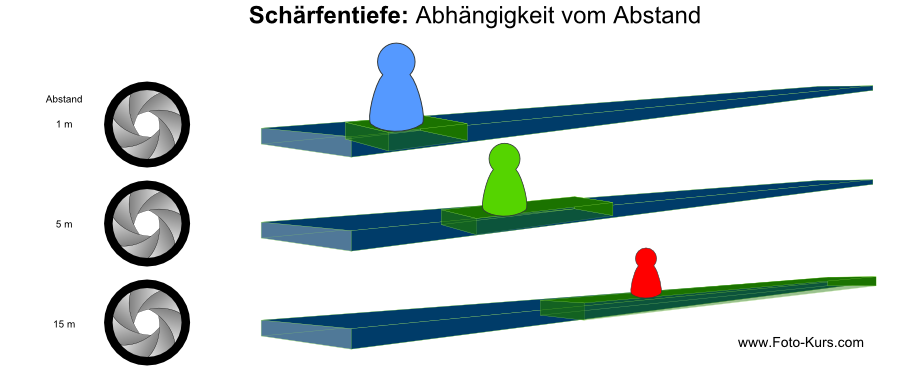
Aggravating is, that we cannot go as close as we want to. Here we have several obstacles causing trouble:
- if we go too close, we kill the object, which we want to photography, with the objective
- every objective needs a minimum distance, which the producer specifies and which is measured from the sensor of your camera
- we block our own light and overshadow the photomotive itself
- You might not get as close as you want because of the natural escape distance of the animals
Objectives to keep your distance - mind the escape distance
Depending on our objective we can increase the distance. More distance also has the advantage that it solves the third problem, as do not stand in our own light anymore. Let us take a look at different focal lengths:
| Focal length | Escape distance |
|---|---|
| 50mm/60mm | distance 20 – 30 cm |
| 80 mm – 105 mm | distance 30 – 40 cm |
| 135 mm – 200 mm | distance 40 – 50 cm |
Now we could jump to the conclusion that large focal length are always advantageouse, as we can keep a bigger distance and have more light. But there are also disadvantages! One disadvantage is, that light strong objective with a big focal length are mostly expensive. But the bigger flaw is, that the depth of field strikes again.
Depth of field depends on focal length
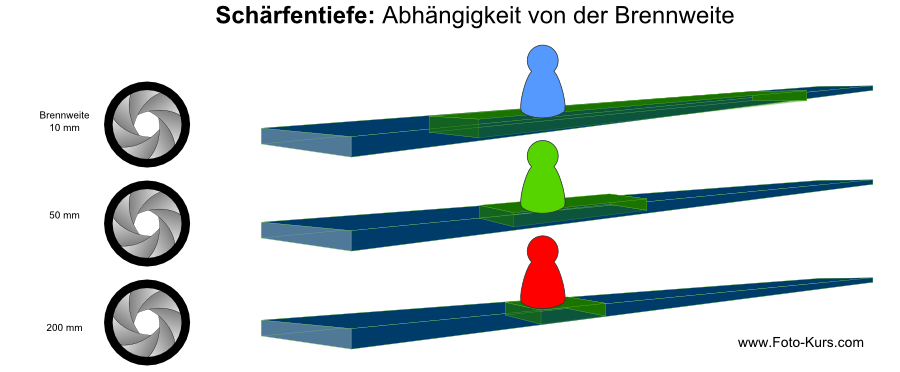
The longer the focal length the fewer depth of field we have.
So, we always live in compromise. That`s life, everything else is fiction!
Some more words about escape distance. Many animals keep astonishingly still, when you get to close. Here you are more likely to have the problem that you do not want to get any closer. Nobody wants to cuddle with spiders and insects (but some things you have to do for an astonishing photo).
A gras hopper even stays still, when you lift the complete chair onto the table, so that it is in the sun and the photos will be extraordinary.
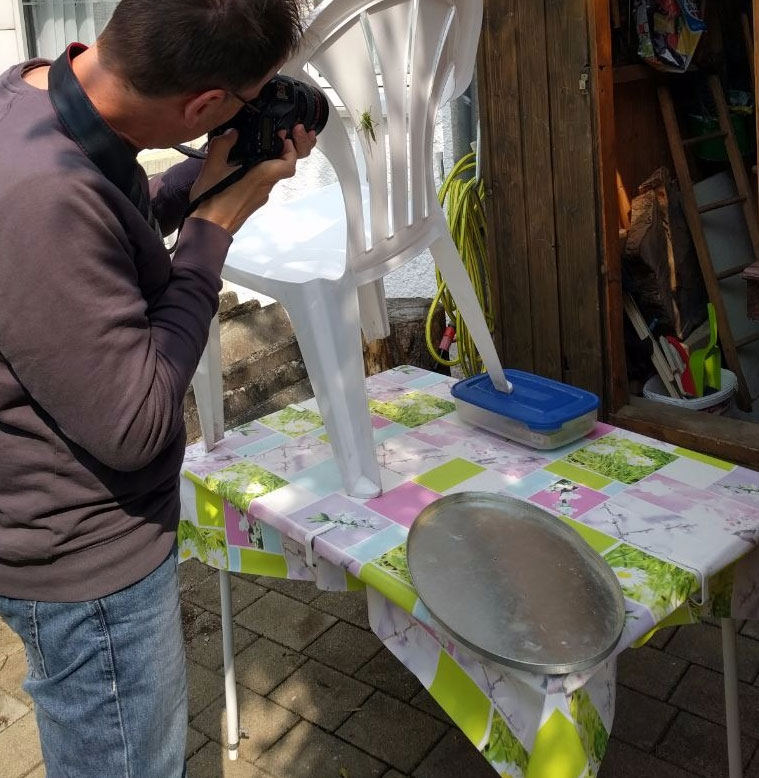
And whoever is curious, how the finished photo looks:

The white is the chair - the sun falls perfectly, that a highlight appears in the eye of the grass hopper and depict the wings partially transparent. A shadow most often adds to a picture.
Hint for macro photography
Because of the scarce depth of field photographing parallel towards the sensor plane is extremly helpful. The photo of the grass hopper shows it in practice. The face and the wings are parallel towards the sensor plane and lay exactly on the plane of best sharpness ("Scheimpflug plane"). All legs (which are towards the camera as the others) are already blurred. Here you can clearly see the little depth of field, even if it was photographed with an aperture of 19.
And now we are at the third important value for depth of field. Also the aperture has direct consequences onto the depth of field.
Depth of field depending on aperture

The smaller the aperture hole (i.e. the bigger the aperture value is), the bigger is the depth of field. But the more light or an increased shutter speed is needed!
For variety a bee:
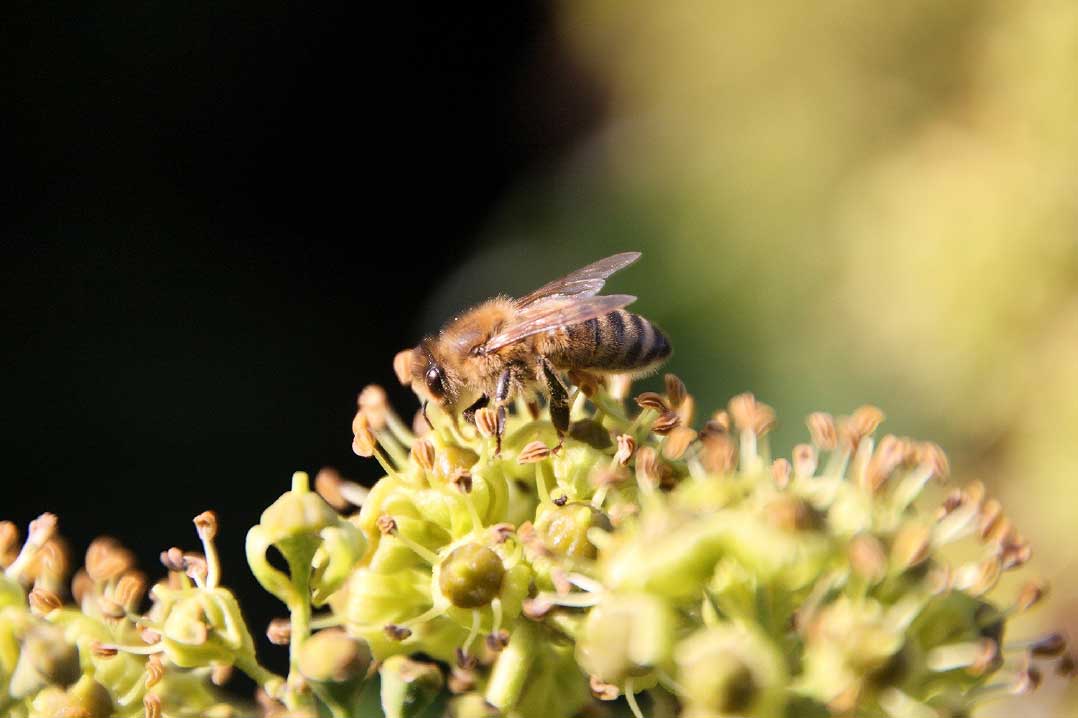
For that picture I also arranged the important parts (eye and wings) parallel towards the sensor plane.
Action on photos in macro photography
But you can also play with sharpness. Photos are much more thrilling, the more action there is in the photo. Here we have the problem, that we mostly have too less light and because of that we need longer shutter speeds. It helps to adjust the ISO values.
Following photo of a wasp is the known motive of the "Feeding of the Predators". Having breakfast with me on the balcony can easily become a photo session.

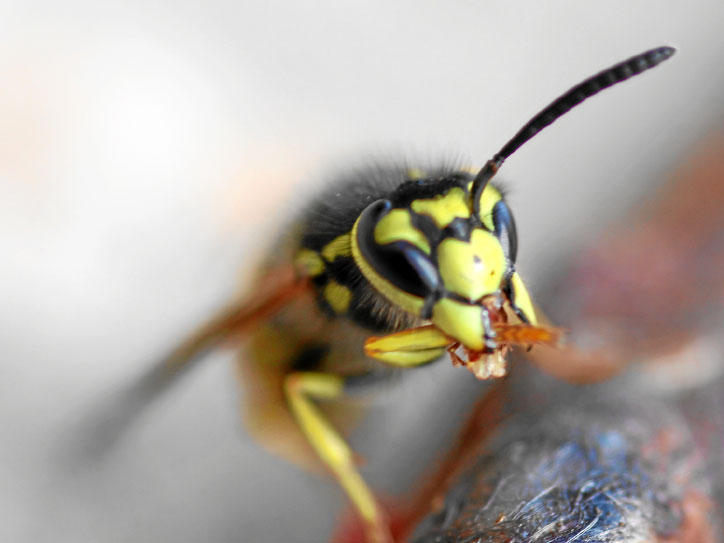
And because it is simply thrilling to see more, here some spiders photos. Spiders can be amazingly big in size, what really helps in macro photography (If you can manage to escape afterwards).

When I took this photo the sun was out for some moments and shown onto the right spot. Being fast and having a camera loaded and ready is a good attitude.
Spiders can also be damned small. Here we have a size comparison in shape of a earwig, which was a feast for this jumping spider.

Retroadapter – increased magnification
Exactly that spider we want to look into its 8 eyes. First the photo and then the incredible variety, how you can do it yourself with an absolutely low-cost objective.
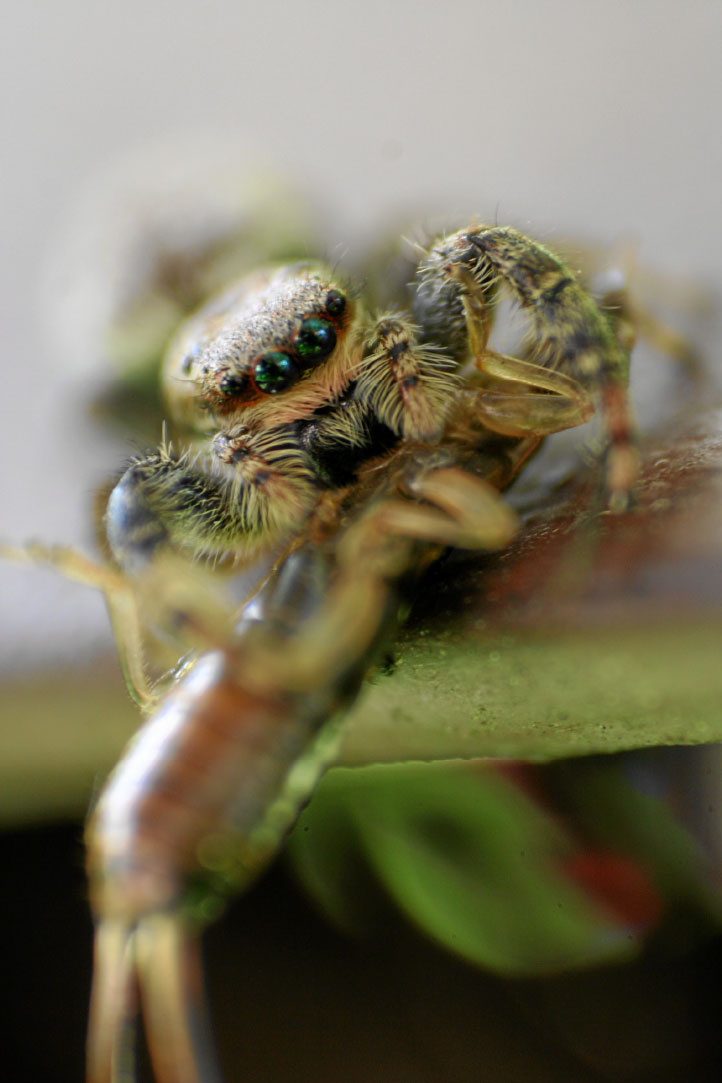
Here we work the way, that we simply turn around the objective.
And the objective of the picture above is a cheap standard objective which Canon delivers when you buy a digital camera from them. It has 18-55 mm and is a very light plastic objective, which has its advantages.
Here we have a scale from above 2 : 1 - and are close to the border of micro photography!
The photo was created by turning around the objective. What the hell does I mean with that? An interchangeable lense can be attached only one way to a camera and just like that the camera can adjust all the settings and send it towards the objective to set the depth of field.
But, when we take of the objective and just turn it around and hold it onto the camera, we achieve an immense magnification. We do not have any support by the electronic. Focusing now means, that we have to move the camera millimeter by millimeter forwards and backwards and aswhile take a lot of photos. There will be plenty of blurred photos, but there will be 1 or 2 photos with an Aha-effect. The spider in the picture above fortunately was a patient one.
Of course this is also possible with more technic. Loyal to the motto: equipment is everything. Important to remember is, that you can also have a lot of fun and make impressive photos without a lot of additional equipment.
If you want to professionalize the whole thing, there are reverse adapter. There is even a high-end version, which reconnects the objective and the camera (Take a look at these Amazon links:für Nikon / für Canon )
So simply play with the means you have and have fun. Sometimes you might think how hillarious it must be for the animals to see a photographer.

Macro objective
And whoever wants to dive deeply into macro photography, can buy himself a macro objective. Here we get a scale of 1:1 much easier, have a light-intense objective (f/2.8 or better) and achieve sharp photos till the edges. Another advantage is, that many macro objectives are internally focussed - i.e. when zooming its length doesn`t change.
Additional tools for macro photography
- Tripod
- Macro objective
- Intermediate rings
- Close-up lens
- Extension bellows
- Reverse adapter
Adjusting slide - macro focussing track-slider
There are adjusting slides for tripods (Always a very good idea for macro photography), which you can move millimeter for millimeter forward or backward.
Macro photography - Small Things Going Big
The charm of macro photography is to see things, that you can´t see with your bare eye, because they are too small. We want to magnify things greatly. The DIN 19040 about macro photography is tolerant with the scale and describes everything between 1 : 10 and 10 : 1 is already macro photography.
Wished is a minimum magnification of 1 : 1 - i.e. the motive is depicted as big on the sensor as it is in nature. When using a full format sensor that would be 36 mm to 24 mm.
When we have a magnification of 2 : 1 then the motive is two times as large as it is in reality.
The good news is, that you can already achieve thrilling photos with simple equipment. But one after another. Macro photography has some pitfalls, which you should know, to not get frustrated.
Great motives are those, which the observer can`t estimate in size, like following plant. The background for the following picture is, that the reader can still think about, if he wants to continue reading! Because now following are a lot of example pictures of insects, like spiders or grasshoppers, which isn`t for everybody. Whoever has an aversion against these animals, should`t continue reading.

In macro photography we often fight with depth of field. In the following picture of a flower stem you can nicely see the droplets on the end of the hairs (are those the correct terms in botanic?). What you can also clearly see is the depth of field, which decreases rapidly. It doesn`t even go around that single stem. The stem in the background is already very blurry.

Here the basics, of what we learned in the chapter about depth of field, are crucial (whoever wants to read it up: https://www.foto-kurs.com/https://www.foto-kurs.com/depth-of-field.php).
Depth of field Depends on Distance
We want details and for that we should go as closely as possible towards the motive. But the depth of field decreases, the closer we are towards the object. And we want to be up close.

Aggravating is, that we cannot go as close as we want to. Here we have several obstacles causing trouble:
- if we go too close, we kill the object, which we want to photography, with the objective
- every objective needs a minimum distance, which the producer specifies and which is measured from the sensor of your camera
- we block our own light and overshadow the photomotive itself
- You might not get as close as you want because of the natural escape distance of the animals
Objectives to keep your distance - mind the escape distance
Depending on our objective we can increase the distance. More distance also has the advantage that it solves the third problem, as do not stand in our own light anymore. Let us take a look at different focal lengths:
| Focal length | Escape distance |
|---|---|
| 50mm/60mm | distance 20 – 30 cm |
| 80 mm – 105 mm | distance 30 – 40 cm |
| 135 mm – 200 mm | distance 40 – 50 cm |
Now we could jump to the conclusion that large focal length are always advantageouse, as we can keep a bigger distance and have more light. But there are also disadvantages! One disadvantage is, that light strong objective with a big focal length are mostly expensive. But the bigger flaw is, that the depth of field strikes again.
Depth of field depends on focal length
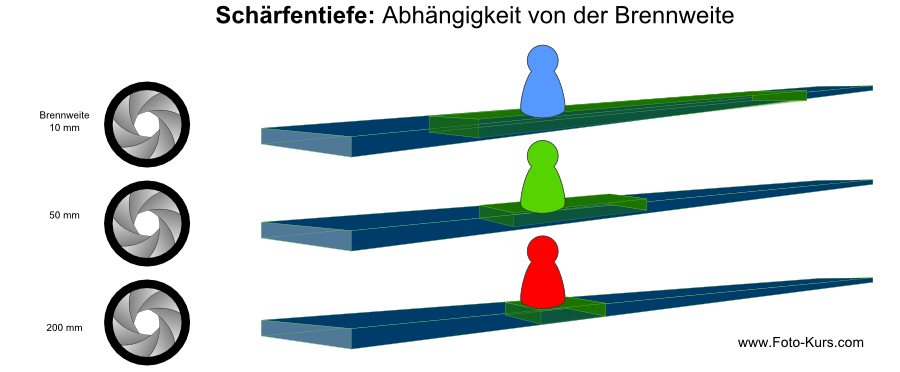
The longer the focal length the fewer depth of field we have.
So, we always live in compromise. That`s life, everything else is fiction!
Some more words about escape distance. Many animals keep astonishingly still, when you get to close. Here you are more likely to have the problem that you do not want to get any closer. Nobody wants to cuddle with spiders and insects (but some things you have to do for an astonishing photo).
A gras hopper even stays still, when you lift the complete chair onto the table, so that it is in the sun and the photos will be extraordinary.

And whoever is curious, how the finished photo looks:

The white is the chair - the sun falls perfectly, that a highlight appears in the eye of the grass hopper and depict the wings partially transparent. A shadow most often adds to a picture.
Hint for macro photography
Because of the scarce depth of field photographing parallel towards the sensor plane is extremly helpful. The photo of the grass hopper shows it in practice. The face and the wings are parallel towards the sensor plane and lay exactly on the plane of best sharpness ("Scheimpflug plane"). All legs (which are towards the camera as the others) are already blurred. Here you can clearly see the little depth of field, even if it was photographed with an aperture of 19.
And now we are at the third important value for depth of field. Also the aperture has direct consequences onto the depth of field.
Depth of field depending on aperture

The smaller the aperture hole (i.e. the bigger the aperture value is), the bigger is the depth of field. But the more light or an increased shutter speed is needed!
For variety a bee:

For that picture I also arranged the important parts (eye and wings) parallel towards the sensor plane.
Action on photos in macro photography
But you can also play with sharpness. Photos are much more thrilling, the more action there is in the photo. Here we have the problem, that we mostly have too less light and because of that we need longer shutter speeds. It helps to adjust the ISO values.
Following photo of a wasp is the known motive of the "Feeding of the Predators". Having breakfast with me on the balcony can easily become a photo session.


And because it is simply thrilling to see more, here some spiders photos. Spiders can be amazingly big in size, what really helps in macro photography (If you can manage to escape afterwards).

When I took this photo the sun was out for some moments and shown onto the right spot. Being fast and having a camera loaded and ready is a good attitude.
Spiders can also be damned small. Here we have a size comparison in shape of a earwig, which was a feast for this jumping spider.

Retroadapter – increased magnification
Exactly that spider we want to look into its 8 eyes. First the photo and then the incredible variety, how you can do it yourself with an absolutely low-cost objective.

Here we work the way, that we simply turn around the objective.
And the objective of the picture above is a cheap standard objective which Canon delivers when you buy a digital camera from them. It has 18-55 mm and is a very light plastic objective, which has its advantages.
Here we have a scale from above 2 : 1 - and are close to the border of micro photography!
The photo was created by turning around the objective. What the hell does I mean with that? An interchangeable lense can be attached only one way to a camera and just like that the camera can adjust all the settings and send it towards the objective to set the depth of field.
But, when we take of the objective and just turn it around and hold it onto the camera, we achieve an immense magnification. We do not have any support by the electronic. Focusing now means, that we have to move the camera millimeter by millimeter forwards and backwards and aswhile take a lot of photos. There will be plenty of blurred photos, but there will be 1 or 2 photos with an Aha-effect. The spider in the picture above fortunately was a patient one.
Of course this is also possible with more technic. Loyal to the motto: equipment is everything. Important to remember is, that you can also have a lot of fun and make impressive photos without a lot of additional equipment.
If you want to professionalize the whole thing, there are reverse adapter. There is even a high-end version, which reconnects the objective and the camera (Take a look at these Amazon links:für Nikon / für Canon )
So simply play with the means you have and have fun. Sometimes you might think how hillarious it must be for the animals to see a photographer.

Macro objective
And whoever wants to dive deeply into macro photography, can buy himself a macro objective. Here we get a scale of 1:1 much easier, have a light-intense objective (f/2.8 or better) and achieve sharp photos till the edges. Another advantage is, that many macro objectives are internally focussed - i.e. when zooming its length doesn`t change.
Additional tools for macro photography
- Tripod
- Macro objective
- Intermediate rings
- Close-up lens
- Extension bellows
- Reverse adapter
Adjusting slide - macro focussing track-slider
There are adjusting slides for tripods (Always a very good idea for macro photography), which you can move millimeter for millimeter forward or backward.
- Home
- Technical basics
- Appropriate digital camera
- Different areas of photography
- Portraiture photography
- 21 posing errors
- From Shooting to Album Design
- From Album Design to Album
- Animal photography
- Fine art nude photography
- Black and white photography
- Sports photography
- Macro photography
- Highspeed Photography
- Available light photography
- The blue Hour
- Firework photography
- Wedding hotography - weddings photography
- Baby bumb photos
- Light painting photography
- Panoramic photography
- Humor and photography
- Baby photography
- The golden cut and the golden spiral in photos
- 10 goldene rules for horrible photos
- free eBook about learning photography
- Tipps and tricks about photography
- Imprint
- Want to do a shooting? Do you want to be a photo model for a day?